
WIMUtil Step-by-Step Guide
WIMUtil (Windows Installation Media Utility) is designed to make creating a custom Windows installer as simple as possible. Follow this guide to create your first customized ISO.
WIMUtil is designed to work only with official Microsoft Windows 10 and Windows 11 ISO files. Although Custom ISOs from third-party sources might work, they are not supported.
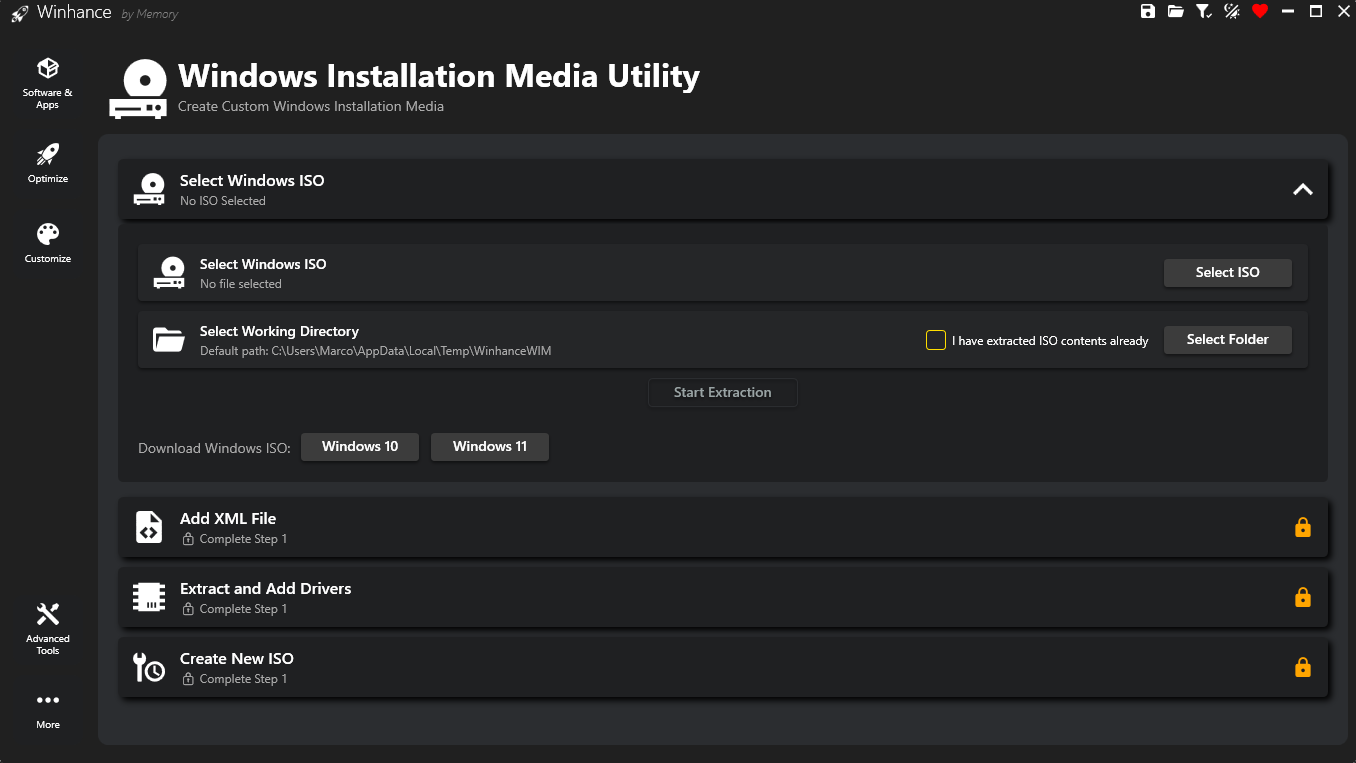
Select and Extract your Windows ISO
First, you need an official Windows 10 or 11 ISO file. You can download these directly from Microsoft using the download links provided in the WIMUtil interface.
1a. Extract the ISO
- Select your ISO using the Select ISO button.
- Choose a Working Directory on a drive with at least 15-20GB of free space. This is where the ISO contents will be extracted.
- Already Extracted? If you've previously extracted an ISO to a folder, check the "ISO already extracted" checkbox, then select that folder. This skips the extraction step.
- Click Start Extraction. Winhance will mount the ISO and copy its contents to your working directory.
Note: Extraction time depends on the ISO size and your drive speed. The process will mount the ISO, copy all files, and then dismount automatically.
1b. Convert Image Format (Optional)
After extraction, an optional conversion card appears. Windows images come in two formats:
- WIM (Windows Imaging Format): Larger file size, but faster installation speed.
- ESD (Electronic Software Download): Highly compressed, results in a smaller ISO file.
WIMUtil automatically detects your current format and displays conversion options:
- WIM → ESD: Compresses the image to reduce the final ISO size.
- ESD → WIM: Decompresses for faster installation performance.
Conversion can take 10-20 minutes depending on your hardware. Most users can skip this step entirely—it's primarily for advanced users who have specific size or speed requirements.
Add an Autounattend XML (Recommended)
This is the "brain" of your customized installer. The autounattend.xml file automates the Windows setup process and applies your settings during installation. Select one of the following options:
- Generate Winhance XML: Creates an XML file based on your current selections in Winhance. Your checked Windows Apps will be uninstalled, and all Optimize/Customize settings will be applied at their current states. This is the recommended option for most users.
- Download UnattendedWinstall XML: Downloads the latest pre-configured XML from the UnattendedWinstall project on GitHub. Requires internet connection.
- Select XML File: Choose an existing
autounattend.xmlfile from your computer. Use this if you've created a custom XML using the Schneegans XML Generator or have a saved XML from a previous session.
Before clicking Generate, make sure your Winhance settings are configured exactly how you want them. Check the Windows Apps you want removed, and toggle all Optimize and Customize settings to your desired states. You can only use one XML file—they cannot be combined.
For a detailed explanation of what the autounattend.xml does, see the Autounattend Guide.
Inject Drivers (Recommended)
Ensure your hardware works perfectly immediately after installation by including drivers in your custom ISO.
- Extract & Add System Drivers: Winhance exports all third-party drivers (WiFi, GPU, Chipset, Audio, etc.) from your currently running system and injects them into the installer. Highly recommended if you are reinstalling Windows on the same machine—your hardware will be fully functional immediately after installation.
- Add Custom Drivers: Select a folder containing
.infdriver files. These will be added alongside any system-extracted drivers (they don't override each other).
How drivers are organized:
- WinPE Drivers (
sources/$WinpeDriver$): Storage/disk controller drivers needed during Windows Setup to detect your disks. - Post-Install Drivers (
sources/$OEM$/$$): All other drivers (WiFi, GPU, Audio, etc.), copied toC:\Windows\Driversand installed via the official WindowsSetupComplete.cmdmechanism.
How Post-Install Drivers Are Installed
WIMUtil uses Microsoft's official SetupComplete.cmd script mechanism—a batch file that Windows Setup automatically executes after installation completes. This script runs pnputil /add-driver to install each driver from the C:\Windows\Drivers folder. This is the same method used by OEMs and enterprises.
On Windows 8 and later, SetupComplete.cmd is disabled when Windows detects an OEM product key (typically embedded in laptop UEFI firmware), except for Enterprise editions. This means:
- Consumer editions (Home, Pro) with OEM keys: SetupComplete.cmd won't run, so drivers won't be installed automatically.
- Windows 10 IoT Enterprise LTSC: SetupComplete.cmd is blocked even though it's an Enterprise edition. Use the standard Windows 10 Enterprise LTSC ISO instead and activate with your IoT LTSC key after installation.
- Windows 11 IoT Enterprise LTSC: Works correctly by default.
If your drivers weren't installed automatically, you can install them manually from Device Manager by browsing to C:\Windows\Drivers.
After Windows is installed, you can find the extracted drivers at C:\Windows\Drivers. If any driver wasn't installed automatically, open Device Manager, right-click on the device with a missing driver, select "Update driver" → "Browse my computer for drivers" and point it to this folder.
Create the Bootable ISO
The final step combines everything into a single bootable ISO file.
- Download oscdimg (if needed): Winhance uses
oscdimg.exefrom the official Windows ADK (Assessment and Deployment Kit) to create bootable ISOs. If it's not detected on your system, click the Download button. Winhance will automatically download and install only the required ADK Deployment Tools component. This is a one-time installation and requires internet access. - Once oscdimg is available, choose an Output Location for your new ISO file.
- Click Create ISO.
What happens: Winhance uses oscdimg.exe to create a dual-boot ISO that works with both UEFI and Legacy BIOS systems. The resulting ISO is a fully bootable Windows installer containing your XML file, drivers, and any other customizations.
Your custom ISO will be larger than the original due to the added drivers and configurations. For example, a 7.5GB Windows 11 ISO might become 9-10GB with drivers included.
When you install Windows using an ISO created with a Winhance-generated XML, a shortcut titled "Install Winhance" will be placed on your new desktop. Running this shortcut will automatically download and install the latest version of Winhance from GitHub, allowing you to:
- Install additional software from the External Software section (browsers, utilities, etc.)
- Fine-tune any settings that weren't included in the XML
- Manage Windows apps and features
Note: This shortcut requires an internet connection. If you removed Microsoft Edge during installation, you won't have a browser until you install one via Winhance or WinGet.
Once your custom ISO is created, use one of these tools to create a bootable USB drive:
- Ventoy (Recommended): Install Ventoy to a USB drive once, then simply copy ISO files to it. You can store multiple ISOs and choose which one to boot. No need to reformat for each new ISO. Watch the Ventoy tutorial
- Rufus: Traditional tool that writes a single ISO to a USB drive. Simple and reliable, but requires reformatting for each new ISO.
After creating your bootable USB, boot from it and follow the normal Windows installation process. Your autounattend.xml will automatically apply your customizations!